User interface
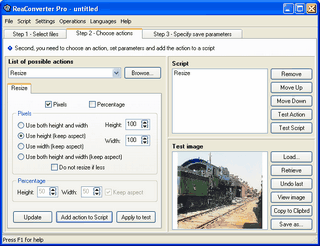
 Step 2 - Choose action
In this section the user interface components of ReaConverter Pro 'Step 2 - Choose actions' are described.
The 2nd Step interface includes three main parts: "List of possible actions" (displays tabs of image editing actions) - at left, "Script" window (displays added actions) and "Test image" (displays your sample image) window - at right.
Navigation
- To choose image editing action click the "Browse..." button or choose an appropriate action from "List of possible actions".
- To try any editing action in any value on a sample image use "Apply to test".
- To apply any editing action in any value to all selected images use "Add action to Script".
- To change action at the script, choose it at the script window and use "Update".
- To delete editing action from the script use "Remove".
- To set a queue of actions at the script us "Move Up" and "Move Down".
- To try all actions added to the script on a sample image use "Test Script".
- To restore test image after applying actions or script use "Retrieve".
- To restore test image after applying last action use "Undo last".
- To view test image double click it or use "View image".
See also:
Step 3 - Specify save parameters
Editing images
Test image
Script